Maximizing the Usefulness of Lens Depth of Field Scales
A QUICK Tutorial
I have found that sometimes new photographers are a little puzzled when dinosaurs like myself lament the lack of depth of field scales on many newer lenses. Are they really that useful? The answer is that they may be more useful than some think. Let's take a look.
Depth of Field as a Creative Tool
I like to think the process of making an image as a series of creative decisions. Depth of field is only one of these decisions, but it's one that, in my opinion, is often not given enough thought. If you are not sure you have a grasp of the concept of depth of field, you might want to review this short tutorial. Here are some review definitions:
Depth of Field--The area in front of and behind the point of focus that is also in acceptable focus.
Near Limit--The point nearest the camera that is in acceptable focus.
Far Limit--The point most distant from the camera this is in acceptable focus
Please remember that what constitutes "acceptable focus" is very subjective. Depth of field charts and the scales that appear on the barrel of the lens make assumptions about print size, viewing distance and as well as what most people consider to be "acceptable focus" or sharpness. You'll find that there are differences in the depth of field given by different sources (i.e., different charts and different lenses) and this is because they have made different assumptions. This tutorial is about using the scale that appear on lenses and if your experience shows that their idea of "acceptable focus" doesn't match yours, then you will have to make adjustments. In my opinion, most of these scales are a little on the optimistic side and I often use a smaller f/stop than they indicate if sharpness is really critical to the image (and if it is possible to do so.)
The Depth of Field Scale
In the lens DOF scale shown below, the bottom part that shows f/stops is stationary and the two distance scales at the top move as you focus. This scale is easy enough to understand even though it might seem too vague, imprecise or jumbled to be useful. The scale shown below would be interpreted as follows:
--The point of focus is the red diamond in the middle of the bottom scale. Right now the lens would appear to be focused on a point approximately 30 feet from the camera or at something just less than 10 meters.
--The depth of field for any given f/stop is the distances between that f/stop's indicator lines on the bottom scale. For example, in this situation, at f/22 the depth of field would be from 15 feet (near limit) to infinity (far limit), at f/16 it would be from 5 meters or probably around 16 feet to just over 75 feet and so on.
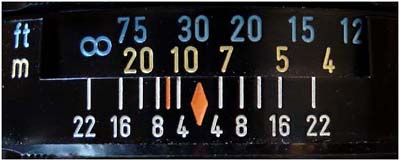
While this information is of use, it's not exactly earth shaking. Frankly, in my opinion, it is of rather limited value in many situations. For example, I may have some trouble guessing just where 75 feet from the camera actually is.
Using the Scale for Creative Decisions
The scale is much more useful if you use it to determine the f/stop that places the near and far limits where you want them to be. The procedure summarized is roughly as follows:
1) Compose
2) Decide on the near limit
3) Decide on the far limit
4) Decide on a feasible f/stop
Step 1--Decide on the Composition
This is nothing different than what you normally do. You can do it by looking through the viewfinder or a cardboard cutout. Keep in mind, however, that your viewfinder may not show 100 percent of what will appear in the image. If it only shows 94 percent, then you might want to make allowances. Why waste image space?
Step 2--Decide on the Near Limit
Looking at your composition, decide where you would like to place the near limit. If you want the image to appear sharp for the entire foreground you'll want to select a point near the bottom of the viewfinder or even just below what is seen in the viewfinder if the viewfinder doesn't show 100 percent. Select an object at this point and focus on it. For example, if this is a landscape then you might focus on a rock or a clump of grass. (I've often placed an object here such as a flashlight to focus on).
Assume you've focused on the near limit and the scale looks as follows:
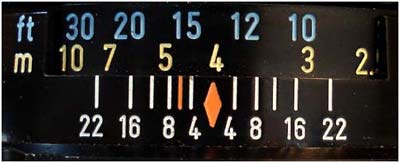
Make a mental note as
to where the point of focus is on the scale. Here I would
note that the point of focus is very slightly to the left of the "4"
on the meter scale. It is not relevant whether you reference
the meter scale or the feet scale. Also, the
distance is not important. The only thing that matters is that
you be able to identify the point on the upper scale where the near
limit is in focus. Here it is easy because it is almost exactly
on the 4. Sometimes, especially with closer distances, you are
not as lucky and the point may be between numbers. In that case
you'll have to make do with remembering that the point is one half of
the way between l and l.5 meters or something similar. This is
not as convenient, but it is still doable.
Step 3--Decide on the Far Limit
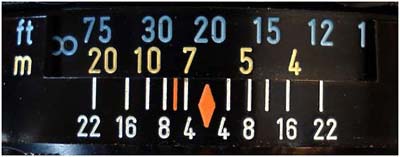
Repeat Step 2 for the far limit. If you want the far limit to be infinity then just use the infinity sign; there's no need to focus on anything. For this example, assume you made the far limit decision and focused on an object at that point and the scale now looks as follows:
Step 3--Decide on the Far Limit
Repeat Step 2 for the far limit. If you want the far limit to be infinity then just use the infinity sign; there's no need to focus on anything. For this example, assume you made the far limit decision and focused on an object at that point and the scale now looks as follows:
Make a mental note
that the far limit is exactly at 20 feet. Again, whether you use
feet or meters (or mix them) doesn't matter. The only thing
important is that you identify and remember the point on the scale.
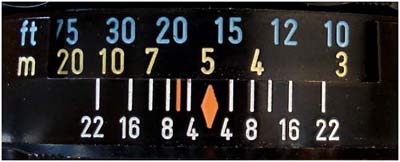
Step 4--Select an f/stop
You are now ready to select an f/stop that will place the depth of field where you want it. Remembering the reference point for the near and far limits, rotate the focusing ring until these two points are on or just within the same f/stop indicator line. In our example, the "4" on the meter scale (near limit) and the "20" on the feet scale come very close to lining up with the f/8 indicator lines. You could probably go ahead and use f/8, but, I'd probably bump it up to f/11 if DOF was critical and, of course doing so wouldn't cause other problems. Also, I might use f/11 if I thought this scale was a little on the optimistic side.
If you are accustomed
to focusing on an object that's the center of interest in the
composition you will need to resist the urge to refocus and have
confidence that it will be in acceptable focus.
Occasionally, you may find that the limits you have selected are just not possible in that they exceed the DOF provided by the smallest f/stop. In this case you'll just have to make a creative decision about priorities. The decision depends on what you are trying to accompolish in making the image, but I'll usually sacrifice background sharpness in order to render the foreground sharp.
Also, DOF decisions are not made in a vacuum. For example, you may have to balance the desire for a deep DOF with the desire for a fast shutter speed to stop subject movement. Part of what makes photography fascinating is that it involves interrelated decisions and incompatible objectives. It's up to you to set priorities and decide on compromises.
I've tried to keep this as brief as possible so if you have questions (or comments) please feel free to email.


