
Filters in Black and White Photography
Links for Specific Information
If you are already familiar with filters and are looking for specific information you might use one of the following links:
Purpose of Using Filters
Color filters allow the black and white photographer to
exercise some selective control over tone values. To this extent
they can be an important tool in helping photographers realize
their creative vision; to put on film what they see in their
minds' eye. At times the use of filters are almost mandated by
the limitations of the medium. For example, film users quickly
learn that, despite being called "panchromatic", film is extra
sensitive to (i.e., overexposes) the blue and ultraviolet (UV)
light in skies resulting in the dreaded "white sky" effect. A
filter may be needed to compensate for this bias.
Another problem in using the grey scale pallet is that, with
exception of the blue bias mentioned above, objects of similar
reflectance may have similar tone values in the resulting print.
For instance, if we were photographing an apple tree and found
that the green foliage and red apples have similar reflectance
(similar reflected light meter readings) they might be almost
indistinguishable in tone in a B&W print. In this case the
photographer might choose to use a red filter to lighten the
apples and darken the foliage or use a green filter to darken
the apples and lighten the foliage.
With the exception of color correction filters, color filters
are pretty much exclusively used by B&W photographers
However, we share some other filters with color photographers.
These filters might be to used to reduce haze, reflections or
glare. We might also use neutral density filters to reduce the
light reaching all or part of the film. These are discussed in
more detail below.
How Filters Affect Tone Values
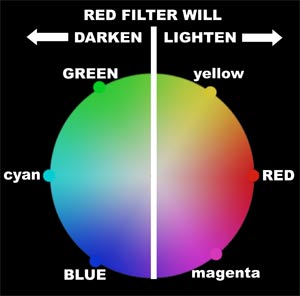
In a nutshell, a colored filter used with B&W film will lighten similar colors and darken opposite colors. The color wheel shown below provides a visual example of what is meant by similar and opposite colors. A red filter, for example, will darken the other two primary colors (blue and green) and will especially darken its complementary or opposite color color (cyan) that is formed by combining green and blue. On the other hand, it will lighten red objects and to a lesser extent colors that contain red such as yellow, orange and magenta. Yellow filters will do a particularly good job of darkening blue objects but tends to lighten red and green objects and so on.
A filter lightens and darkens because it transmits some colors and absorbs (or filters) others. Obviously, because it absorbs light , using a filter will necessitate an increase in exposure. (The UV filter is an exception.) Logically, darker filters require more exposure compensation. Filter makers will suggest an amount of exposure compensation and this is discussed below. However, think of this as just a suggested starting point. The actual effect of a filter and the amount of exposure compensation it needs will depend on:
- The film being used. I think we can expect some differences in color sensivity among different films and particularly among different emulsions such as the older emulsions, (Tri-x, Plus-x), the newer T-grain emulsions (T-max) and chromogenic emulsions such as Ilford's XP2.
- The color of the ambient light. The color temperature of light varies throughout the day and could be thought of as changing the exact color of objects and how much of the light is transmitted or absorbed.
- The predominant color of the subject. For example, making an image using a yellow filter and filling the frame with yellow sand dunes or "amber waves of grain" might require significantly less exposure compensation since less light will be absorbed by the filter.
Simulation of Filter Effects
This page is still in the experimental stage. It should allow you to view an image in color and/or in black and white using various filters. Filter effects are only simulated and were not made using filters and black and white film. Also, there may be a problem viewing this with older browsers. Your comments would be most welcome!
The
amount of exposure compensation is often expressed as a
"filter factor". A filter factor of 2X means that you should
should multiply the (unfiltered ) exposure by 2, a 2.5 filter
factor means that you should multiply it by 2.5 and so on.
However, filter factors can be confusing. How in the heck do
you multiply f/11 @ 1/60 by 2.5? For this reason, most of us
want to think of exposure in terms of f/stops instead. Below
is a table that should the f/stop equivalent for various
filter factors and a javascript calculator that will calculate
the f/stop compensation for any filter factor. See Filter FAQs for a discussion of using filters
with TTL metering.
Converting Filter Factors
to F/stopsFilter
Factorf/stops
Filter Factor f/stops 1x --
4x +2 1.2x +1/4
4.8x +2 1/4 1.25x +1/3
5x +2 1/3 1.4x +1/2
5.7x +2 1/2 1.6x +2/3
6.4x +2 2/3 1.7x +3/4
6.8x +2 3/4 2x +1
8x +3 2.4x +1 1/4
9.5x +3 1/4 2.5x +1 1/3
10x +3 1/3 2.8x +1 1/2
11.4x +3 1/2 3.2x +1 2/3
13.5x +3 3/4 3.4x +1 3/4
16x +4
Convert Filter Factor to f/stop
Most photographers I know write the exposure compensation in
f/stops on the plastic filter case so that they don't have to
think about it in the field. Should you get stuck with just the
filter factor information an alternative method is to divide
your film's ISO (or your personal exposure index) by the filter
factor and use this as your new ISO in determining
exposure. For example, if the filter factor is 2.5 and
your ISO is 100, dividing 10 by 2.5 would give you your new ISO
of 40.
Suggestions for Using Color Filters
Here are a few things you might consider, especially if you are relatively new to using color filters:
- Nothing beats experience. Trying filters with your choice of film is the best way to get a feel for the effect they will have and the exposure compensation needed.
-
Experiment. If possible,try making the image with and without a filter, bracket exposures and try different filters. - Think it through. Look carefully at what you are photographing and remember that a filter may affect several of the objects in the image, not just the one that you are concentrating on. Even then, you can expect some unintended or unanticipated results.
- Don't overfilter. Filters come in different strengths and it is a good idea to use the least amount filtration that will accomplish your goals. For example, it is easy to get carried away with trying for dramatic skies by using a dark red filter and, in the process creating a negative that is overly harsh and difficult to print, perhaps, partially due to the unanticipated results mentioned above.
What Filters Do You Really Need?
Many photographers, myself included, wind up with more filters than they really need and certainly more filters than they can easily carry into the field. We have a tendency to put together a set of filters piecemeal by buying them for a special situation or as we need new sizes for new lens. Step-up rings can be a real pain, but you can possibly save yourself some money as well as bag space by using them. A step-up ring is an adapter that allows you to use a larger filter than is required by your lens. For example, you might get a 49mm to 58mm step-up ring. (There are step-down rings but I wouldn't recommend them except for the smallest of increments and even then I would avoid using them with wide angle lenses.) The trick is to anticipate the largest filter you might need by looking at the lenses you might add to your system. And, as long as that this lens does not require an exceptionally large filter, buy filters of this size and step- rings. Filter costs increase as size increases& and only so much step-up is really feasible.
Because of all the different colors and strengths, there is a fairly large number of color filters available.It would be nice to have all of them available for use, but, in my opinion, there would be many that you just wouldn't use that much and you certainly wouldn't be able to carry them all with you all the time. I think it is best to think hard about what the filters do and the kind of photography you do and set some priorities. Just as an example, I have listed the filters I usually carry below. The color filters are for B&W work and the other, the UV, polarizer, and graduated neutral density, are used for color work as well. These are discussed below.
| Filter** | Filter
Factor |
f/stop Increase |
Filter Effects | Lightens | Darkens |
| Medium
Yellow 8 (K2) |
2x | +1 | Probably the most widely used. Offers an accurate tone range in compensating for the blue sensitivity of panchromatic films. Will slightly darken sky and increase contrast between blue sky and clouds. Also may help reduce haze. | Yellow, Chartreuse, Olive, Red, Pink, Orange, Lime Green | Blue, Violet, Purple, Lilacs |
| Deep Yellow 15
(O) |
2.5x | +1 1/3 | Stronger effect than medium yellow. May darken sky considerably | Yellow, Chartreuse, Olive, Red, Pink, Orange, Lime Green | Blue, Violet, Purple |
| Red 25
(A) |
8x | +3 | Produces very dramatic skies. Effects may border on the surreal. Darkens foliage. Reduces haze. | Reds, pinks, magentas, some browns, yellow, orange | Blues, greens, cyan |
| Green 11*** | 4x | +2 | Lightens foliage and will darken skies somewhat. Sometimes used to produce pleasing skin tones in portraits | Yellow, yellow-green, olive, greens | Blue, violet, magenta, red, maroon |
| UV | 1x | 0 | Absorbs UV radiation and will reduce distant haze or fogginess | ||
| Polarizer | 2.5x | +1 1/3 | Helps remove reflections and glare. May cut pollution haze. Darkens sky. | ||
| Grad ND | n/a | n/a | Reduces the amount of light reaching a part of the image -- usually used to darken the sky. |
*The correct title should probably be: "Filters I Usually Carry in the Field".
**Numbers such as "Red 25" are Kodak designations. These filters may be assigned different numbers by other manufacturers. I have included some othr common designations such as "K2".
***For some lenses I have a darker version called Green 58 instead of the Green 11. It requires three stops extra exposure.
Other Filters for Black and White
The UV Filter.-- The Ultraviolet or UV filter
helps block ultraviolet light that an cause a hazy look in
distant parts of an outdoor image. In color work it can help
reduce the blue cast due to UV rays. Some photographers leave it
on all of the time to protect the lens. See the FAQ
section below.
The Polarizer or Polarizing Filter.--I consider
the polarizing filter to be essential for color work and
sometimes useful for B&W work. One use of a polarizer
is to darken skies although you are limited to that portion of
sky which is a right angle to the sun. For example, if the sun
is in the far east or west, you can darken the southern or
northern sky. The effect can easily be seen by rotating
the filter. You do, however, have to watch out for uneven
effects when using a wide angle lens. Note that only the
clear part of the sky is darkened. Cloudy skies are not
affected.
The polarizer can be effective in reducing specular highlights
(glare) and reflections on nonmetallic surfaces. Again,
the effect can be seen through the camera when the filter is
rotated and is strongest at about a 30 or 35 degree angle.
Eliminating these can increase color saturation. Glare or
specular highlights are always the color of the light source
and, of course, the source is usually whitish. If you are
photographing a lawn each shinny blade of grass could have a
small white highlight and, while the lawn still looks green, it
will look even greener without the white highlights. The same is
true of other surfaces.
The polarizer can also be effective at reducing haze that I
assume is light reflecting off of particles in the air. On
a trip to the Grand Canyon many years ago, people were amazed at
the difference in the view through the viewfinder of my camera
with a polarizer compared to the naked eye. If you run
into that sort of situation you'll want to give it a try.
It has always seemed to me that one of the biggest differences
between B&W and color photography is that in color
photography glare and reflections are usually annoying
distractions and removing them can result in color saturation
that is more pleasing. One the other hand, using a
polarizing filer in B&W photography can result in a image
that lacks sparkle and life. Of course, that's just my two
cents.
If needed, a polarizer can be used as a neutral density filter
in a inch. Even when it is not rotated it requires about a
1 1/3 stop increase in exposure.
Polarizing filers can be linear or circular. Dinosaurs
like myself that still use older equipment can usually get away
with using a less expensive linear polarizer. Those of you
using newer autofocus and autoexosure equipment will most likely
have the privilege of paying more for a circular
polarizer. If in doubt, consult your camera' manual.
Of course, my digital camera requires a circular filter.
the Graduated Neutral Density Filter.--Part of
this filter is clear and part of it is a neutral grey color with
a gradual transition between the two. The most common type is
square and fits in a special holder that allows you to move the
filter to be rotted and shifted up or down relative to the lens
so as to place the dense portion where exposure needs to be
reduced. These
are commonly ued to reduce the exposure the sky receies and thus
darken it. Obviously, you need a fairly straight horizon
for this to work and even then it requires a little
practice to keep its use from being too obvious. My
technique is to put the grey portion well above where it needs
to be and gradually move the filter down in the holder until I
can see the effect. At this point I know from experience that I
have gone too far so I then move it up approximately one-quarter
of an inch. Works for me!
These
are commonly ued to reduce the exposure the sky receies and thus
darken it. Obviously, you need a fairly straight horizon
for this to work and even then it requires a little
practice to keep its use from being too obvious. My
technique is to put the grey portion well above where it needs
to be and gradually move the filter down in the holder until I
can see the effect. At this point I know from experience that I
have gone too far so I then move it up approximately one-quarter
of an inch. Works for me!
Filter FAQs
Some of these FAQs I think I know a good answer to and some of them I don't. In either case, it's just my opinion.
- Should I leave a UV filter on to protect my lens? Some, especially peole that sell filters think this is a great idea. Others would argue that they could have a degrading effect and, if you are going to do this, why bother with expensive muli-coated lenses designed to reduce flare. Frankly, I don't know if you could tell the difference in most images. One drawback is that you might need to remove them when using another filter. Stacking them might cause a vignetting problem. I don't leave them on but, on the other hand, I keep a lens cap on unless I'm taking a shot. If I would subject the lens to damage by simply removing the cap I probably wouldn't have my equipment there in the first place. Also, I'm a big fan of lens hoods and they might provide addition protection.
- What is the difference between a UV filter and a skylight filter? These are often confused. Both help reduce UV rays but the UV is clear and the skylight is a very light pink.
- Will TTL Metering give me the correct exposure when using filters? It would probably be wrong to assume that a camera meter's sensivitity to a color would be the same as any particular film's. However, I would guess that it would get you very close in most cases. Try it and see.
- Can two filters be used at the same time and, if so, how do you calculate exposure compensation? You can stack filters but, with the exception ofusing a polarizing or UV filters or multiple neutral density filters thre would be little reason for doing so. If you ue two red filters, say a Red 23 and a Red 25, the effect would be the same a just using the strongest filter except more exposure compensation would be needed. If two filters are used, you can multiple their filter factors or add their respective compensation in f/stops.
